Ace
Ace is a command-line framework embedded into the core of AdonisJS. Commands like node ace serve or node ace make:controller is powered by the Ace CLI.
Ace also allows you to create custom commands by storing them locally within your project codebase.
Why we use Ace instead of npm scripts?
The majority of the Node.js projects extensively make use of the npm scripts . Npm scripts are great, as they allow you to define scripts on a per-project basis vs. defining them globally somewhere on your computer.
However, npm scripts don't give you any tooling to create the CLI commands. You still have to manually parse the CLI arguments/flags and also manage the command lifecycle.
On the other hand, Ace is a proper framework for creating CLI interfaces.
Usage
Ace comes pre-configured with every new AdonisJS application, and you can run it using the ace file stored at the root of your project.
node ace

The ace file is an extension-less JavaScript file that you can execute like any other Node.js program. Running this file will boot the command line framework and execute the mentioned command.
You can list all the commands by running node ace --help, and view help for a particular command using node ace <command-name> --help.
Where are the commands defined?
Ace allows you and the packages you install to contribute commands. They are defined inside the .adonisrc.json file under the commands array.
{
  "commands": [
    "./commands",
    "@adonisjs/core/build/commands",
    "@adonisjs/repl/build/commands"
  ]
}
Every entry inside the array must point to a file that exports an Ace command . Or it can export an additional array of commands .
The first entry, ./commands is a reference to the commands directory of your project. Files inside this directory are scanned and registered as commands.
Creating a new command
You can create a new command by running the following Ace command.
node ace make:command Greet

# CREATE: commands/Greet.ts
Before you can run the newly created command, you will have to get it indexed by running the following command. Learn why indexing is required
node ace generate:manifest
Finally, you can run the command as follows:
node ace greet

# [ info ]  Hello world!
Commands structure
Ace commands are represented as classes and extend the BaseCommand class. You define the command name and description as static properties on the class itself.
import { BaseCommand } from '@adonisjs/core/build/standalone'

export default class Greet extends BaseCommand {
  public static commandName = 'greet'

  public static description = ''

  public static settings = {
    loadApp: false,
    stayAlive: false,
  }

  public async run () {
    this.logger.info('Hello world!')
  }
}
commandName
The name of the command one should type to run the command. It should always be a string.
description
The command description is shown in the help output. Use this property to explain what the command does briefly.
settings
The settings property controls the runtime behavior of the command.
| Option | Description |
|---|---|
| loadApp | Instructs Ace to boot the application before running the method. By default, commands do NOT load the application and are executed as independent scripts. |
| stayAlive | Instructs Ace to NOT kill the process after running the command. However, do make sure to manually kill the process using await this.exit() |
aliases
You can also define an array of aliases for the command name. This allows others to execute the command using the aliases as well.
export default class Greet extends BaseCommand {
  public static commandName = 'greet'
  public static aliases = ['welcome', 'hi']
}
run
Every command must implement the run method and write the logic to handle the command inside it.
Booting the app within the command
Ace commands do not boot your application before running the command. If your command relies on the application code, you must instruct the command to load the application first and then execute the run method.
export default class Greet extends BaseCommand {
  public static commandName = 'greet'
  public static settings = {
    loadApp: true
  }
}
Top-level imports are not allowed
Top-level imports relying on the IoC container or the application codebase are not allowed, and you must move them inside the run method. For example:
❌ Does not work
import User from 'App/Models/User'

export default class CreateUser extends BaseCommand {
  public static commandName = 'create:user'
  public static settings = {
    loadApp: true
  }

  public async run() {
    await User.create({})
  }
}
✅ Works, after the import is moved inside the run method
export default class CreateUser extends BaseCommand {
  public static commandName = 'create:user'
  public static settings = {
    loadApp: true
  }

  public async run() {
    const { default: User } = await import('App/Models/User')
    await User.create()
  }
}
🤷♂️ Reasoning
Let's try to visualize the command lifecycle to understand why top-level imports are not allowed.
- The
Usermodel import internally imports the Lucid ORM from the IoC container. - Since the application is not booted yet, the Lucid ORM is not available.
- To load the application, Ace will first have to reach the
settings.loadAppproperty defined on the command constructor. - However, it cannot because the top-level import results in an error.
There are other ways to design this workflow, but we think moving the imports inside the run method is worth the hassle of keeping all the command settings and metadata inside a single file.
CLI arguments
You register the arguments and flags your command accepts as properties on the class. For example:
import {
  BaseCommand,
  args,
  flags
} from '@adonisjs/core/build/standalone'

export default class Greet extends BaseCommand {
  public static commandName = 'greet'

  @args.string({ description: 'Name of the person to greet' })
  public name: string

  @flags.boolean({ alias: 'i', description: 'Enable interactive mode' })
  public interactive: boolean

  public async run() {}
}
Make sure to generate the Ace manifest file by running the following command.
node ace generate:manifest
And then view the help for the greet command.
node ace greet --help
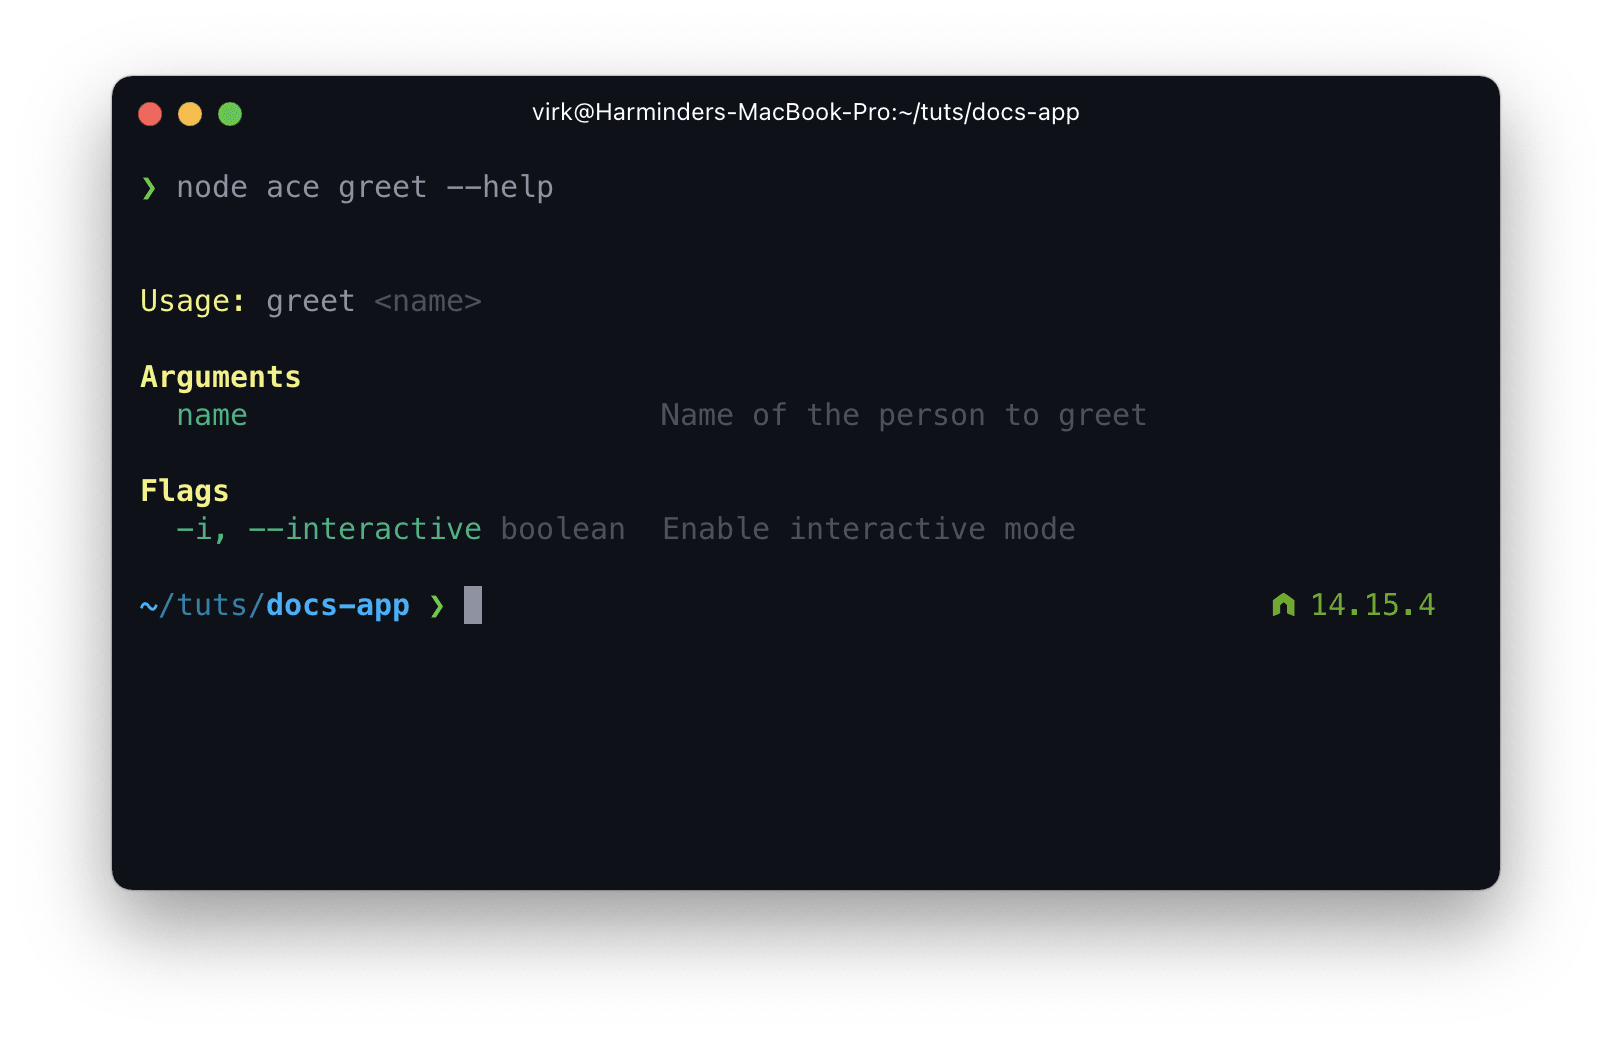
Arguments
Command arguments are positional, and they are accepted in the same order as you define them in your class. For example:
export default class Greet extends BaseCommand {
  @args.string()
  public name: string

  @args.string()
  public age: string

  @args.string()
  public height: string
}
node ace greet <name> <age> <height>
args.string
Marks the property as a command-line argument. Note: The command arguments are always represented as a string. You will have to perform typecasting yourself if expecting a non-string value.
@args.string({
  description: 'The argument description',
  name: 'username'
})
public name: string
args.spread
The @args.spread method allows you to define a catch-all argument. It is like the rest parameters
in JavaScript and must always be the last argument.
import { BaseCommand, args } from '@adonisjs/core/build/standalone'

export default class FileReader extends BaseCommand {
  public static commandName = 'read'

  @args.spread()
  public files: string[]

  public async run () {
    console.log(this.files)
  }
}
node ace read foo.txt bar.txt baz.txt
Output will be
[ 'foo.txt', 'bar.txt', 'baz.txt' ]
Options
All of the @args methods accept the following options.
| Option | Description |
|---|---|
| description | The help description for the argument |
| name | Define a public name for the argument (the one that appears in the help output). |
Flags
You define the flags using the @flags decorator. A flag can accept boolean, string/string[], or number/number[] values.
flags.boolean
Accept a boolean flag.
@flags.boolean()
public interactive: boolean
The value for the boolean flag defaults to false, unless the flag has been specified. However, you can also define the default value yourself.
@flags.boolean()
public interactive: boolean = true
To disable the flag at runtime, you must negate it with the --no keyword.
node ace greet virk --no-interactive
flags.string
Define a flag that accepts a string value.
@flags.string()
public email: string

@flags.string()
public password: string
flags.array
Define a flag that can be repeated multiple times. The value is an array of strings.
@flags.array()
public files: string[]
node ace read --files=foo.txt --files=bar.txt

## Or separate them with comma
node ace read --files=foo.txt,bar.txt
console.log(this.files)

// ['foo.txt', 'bar.txt']
flags.number
Define a flag that accepts a number value.
@flags.number({ alias: 'i' })
public iterations: number
flags.numArray
Same as @flags.array , but instead accepts an array of numbers.
@flags.numArray()
public counters: number[]
Options
All of the @flags decorators accept the following options.
| Option | Description |
|---|---|
| alias | The shorthand name for the flag. The shorthand names are always defined using a single dash - |
| description | The help description for the flag |
| name | Public name for the flag (the one that appears in the help output). |
Prompts
Ace has inbuilt support for creating interactive prompts on the terminal. You can access the prompts module using the this.prompt property.
Following is an example of using multiple prompts together.
import { BaseCommand } from '@adonisjs/core/build/standalone'

export default class CreateUser extends BaseCommand {
  public static commandName = 'create:user'
  public static description = 'Create a new user'

  public async run () {
    const email = await this.prompt.ask('Enter email')
    const password = await this.prompt.secure('Choose account password')
    const userType = await this.prompt.choice('Select account type', [
      {
        name: 'admin',
        message: 'Admin (Complete access)',
      },
      {
        name: 'collaborator',
        message: 'Collaborator (Can access specific resources)',
      },
      {
        name: 'user',
        message: 'User (Readonly access)',
      }
    ])

    const verifyEmail = await this.prompt.confirm('Send account verification email?')
    const accountTags = await this.prompt.enum('Type tags to associate with the account')

    console.log({
      email, password, userType, verifyEmail, accountTags
    })
  }
}
prompt.ask
Displays the prompt to enter a value. Optionally accepts options as the second argument.
await this.prompt.ask('Choose account username', {
  validate(answer) {
    if (!answer || answer.length < 4) {
      return 'Username is required and must be over 4 characters'
    }

    return true
  },
})
prompt.secure
Uses the password prompt type. Optionally accepts options
as the second argument.
await this.prompt.secure('Enter account password', {
  validate(answer) {
    if (!answer) {
      return 'Password is required to login'
    }

    return true
  },
})
prompt.confirm
Display the prompt to select between Yes and No. Optionally you can pass the configuration options
as the second argument.
await this.prompt.confirm('Want to delete files?')
prompt.toggle
Similar to the confirm prompt. However, it allows custom Yes and No display values. Optionally you can pass the configuration options
as the second argument.
await this.prompt.toggle('Want to delete files?', ['Yep', 'Nope'])
prompt.choice
Display a list of options with the possibility to choose only one. Optionally you can pass the configuration options as the third argument.
await this.prompt.choice('Select installation client', ['npm', 'yarn'])
Or pass the choices as an array of objects.
await this.prompt.choice('Select toppings', [
  {
    name: 'Jalapenos',
    hint: 'Marinated in vinegar, will taste sour',
  },
  {
    name: 'Lettuce',
    hint: 'Fresh and leafy',
  },
])
prompt.multiple
Display a list of choices and allows selecting multiple options. Optionally you can pass the configuration options as the third argument.
await this.prompt.multiple('Select base dependencies', [
  '@adonisjs/core', '@adonisjs/bodyparser'
])
Or pass the choice as an object.
await this.prompt.multiple('Select base dependencies', [
  {
    name: '@adonisjs/core',
    message: 'Framework core',
  },
  {
    name: '@adonisjs/bodyparser',
    message: 'Bodyparser',
  },
])
prompt.autocomplete
Display a list of options to make one or more selections, with the ability to filter the list items. Optionally you can pass the configuration options as the third argument.
await this.prompt.autocomplete(
  'Select country',
  ['India', 'USA', 'UK', 'Ireland', 'Australia']
)
For multi-select, you can set options.multiple = true.
await this.prompt.autocomplete(
  'Select country',
  ['India', 'USA', 'UK', 'Ireland', 'Australia'],
  { multiple: true }
)
prompt.enum
Similar to the ask prompt, but allows comma (,) separated values. Optionally accepts options
as the second argument.
await this.prompt.enum('Define tags', {
  hint: 'Accepts comma separated values',
})
All prompts options
| Option | Description |
|---|---|
| default |
The default value to use, when no input has been provided |
| hint |
Display hint to help fill the input |
| result |
Modify the result. The method is invoked just before resolving the prompt promise Note The value will differ based upon the input type. For example: The value for |
| format |
Format the user input in real time (as they type). Note The value will differ based upon the input type. For example: The value for |
| validate |
Validate the user input. Return Note The value will differ based upon the input type. For example: The value for |
Logger
You can make use of the inbuilt logger to log messages to the console. We automatically strip out the colors and icons if the terminal does not support colors.
export default class Greet extends BaseCommand {
  public static commandName = 'greet'
  public static description = 'Greet a person by their name'

  public async run () {
    this.logger.info('This is an info message')
    this.logger.warning('Running out of disk space')
    this.logger.error(new Error('Unable to write. Disk full'))
    this.logger.fatal(new Error('Unable to write. Disk full'))
    this.logger.debug('Something just happened')
    this.logger.success('Account created')
    this.logger.info('Message with time prefix', '%time%')

    const spinner = this.logger.await(
      'installing dependencies'
      undefined,
      'npm install --production'
    )

    // perform some task
    spinner.stop()
  }
}
All logger methods also receive an optional value for the log message prefix and suffix.
this.logger.info('hello world', 'prefix', 'suffix')
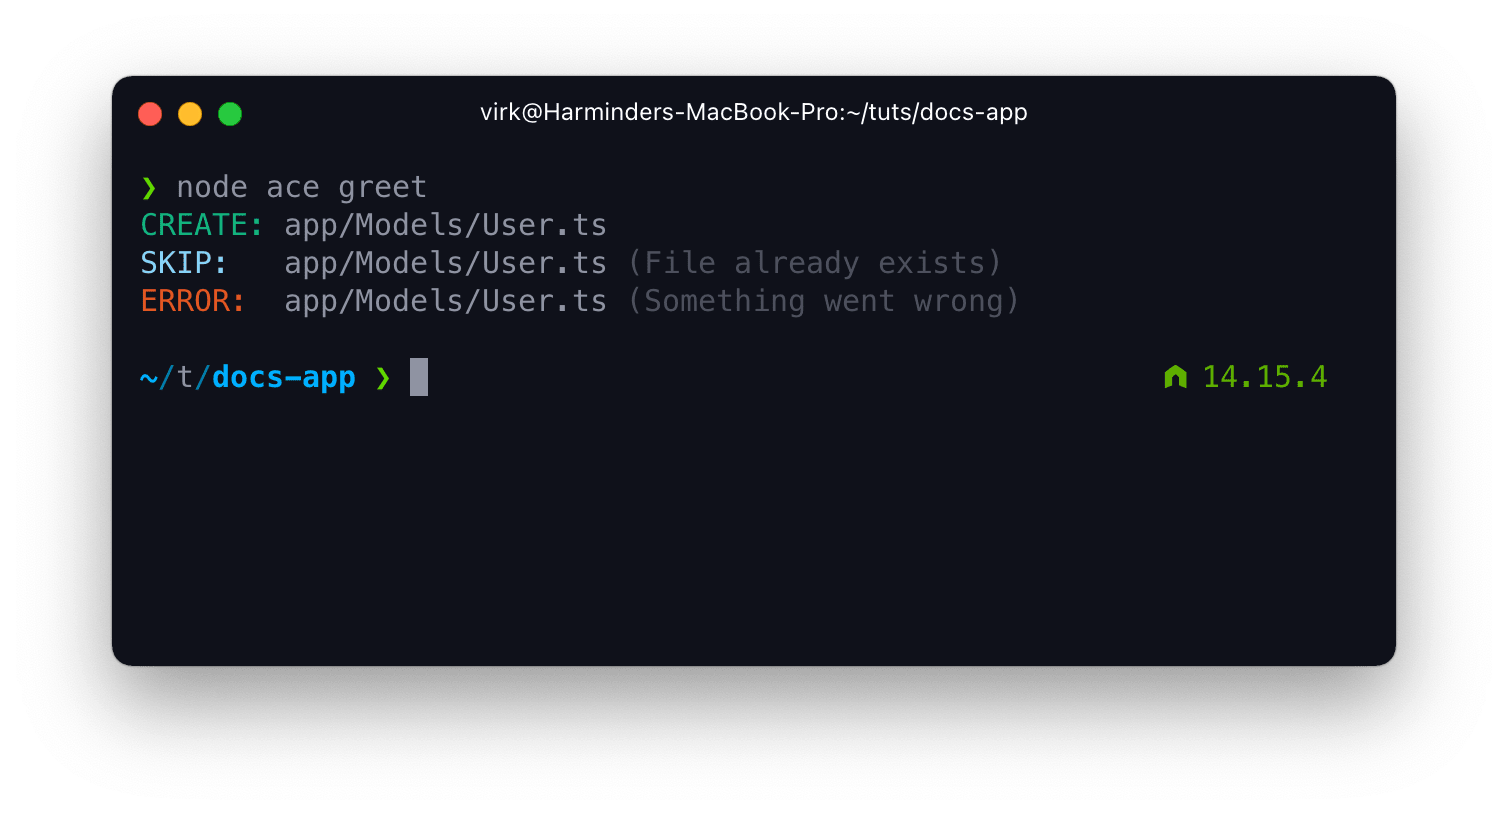
Actions
Along with the standard log messages, you can also display log messages for a specific action. For example, An action to create the file can use the following code to show its status.
The logger actions are used only to display the UI. You still have to perform the action yourself.
const filePath = 'app/Models/User.ts'

this.logger.action('create').succeeded(filePath)
this.logger.action('create').skipped(filePath, 'File already exists')
this.logger.action('create').failed(filePath, 'Something went wrong')
Update existing log line
The logger also allows you to log messages by updating the existing logline. Using this method, you can draw textual and ASCII progress bars.
Every time you run the logUpdate method, it will update the existing logline with the new message. You can persist and move to the new line using the logUpdatePersist method.
Following is a complete working example of displaying a progress bar.
import { BaseCommand } from '@adonisjs/core/build/standalone'

export default class Greet extends BaseCommand {
  public static commandName = 'greet'

  private getProgressBar(currentPercentage: number) {
    /**
     * Draw one cell for almost every 3%. This is to ensure the
     * progress bar renders fine on smaller terminal width
     */
    const completed = Math.ceil(currentPercentage / 3)
    const incomplete = Math.ceil((100 - currentPercentage) / 3)
    return `[${new Array(completed).join('=')}${new Array(incomplete).join(' ')}]`
  }

  public async run () {
    for (let i = 0; i <= 100; i = i + 2) {
      await new Promise((resolve) => setTimeout(resolve, 50))
      this.logger.logUpdate(`downloading ${this.getProgressBar(i)} ${i}%`)
    }

    this.logger.logUpdatePersist()
  }
}
CLI UI
The CLI UI exposes the API to draw tables, render instructions inside a box, and animate progress for tasks.
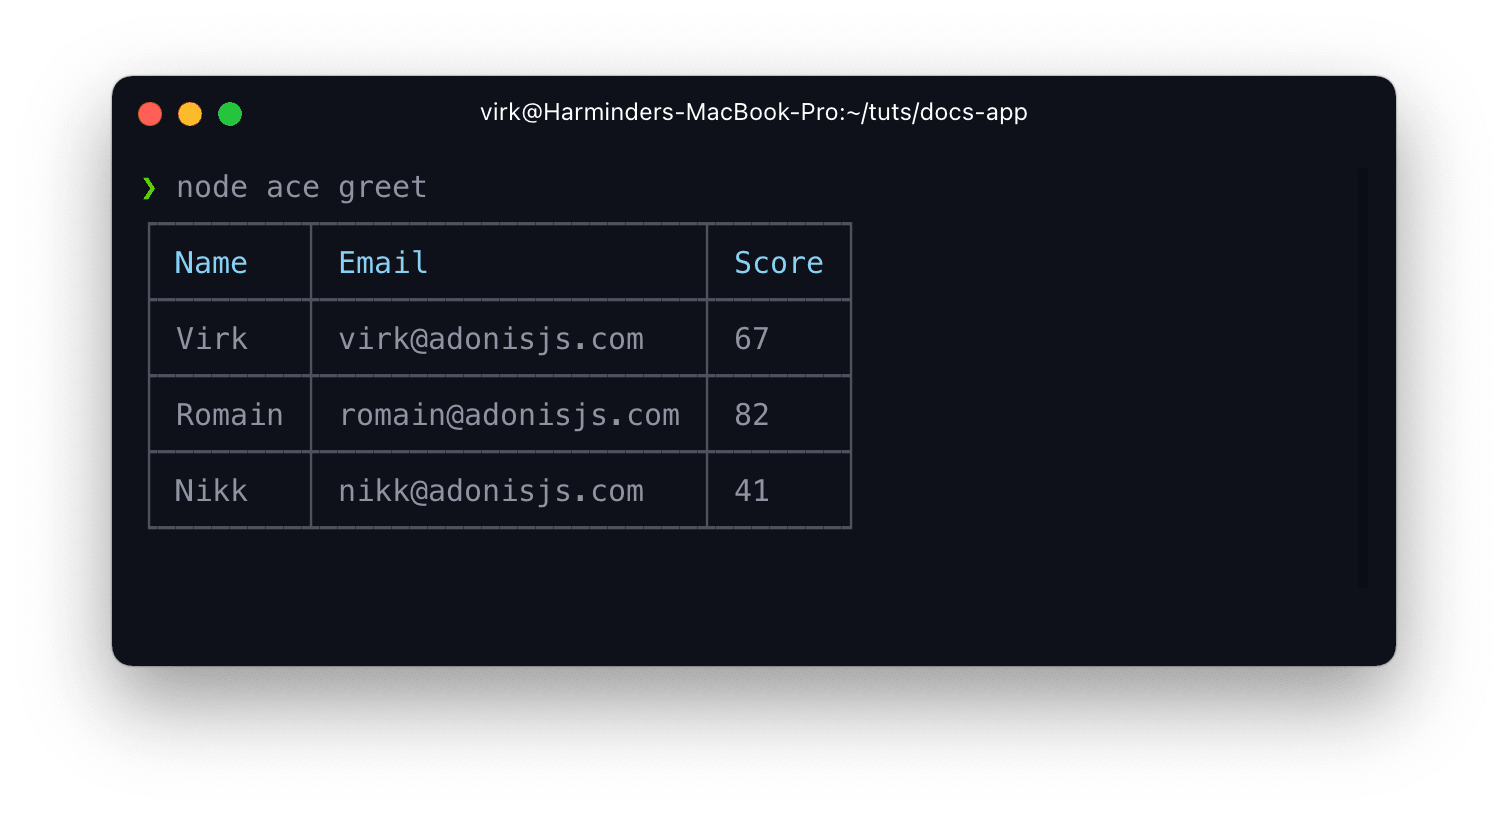
Tables
You can draw tables using the this.ui.table property. Following is an example of the same.
const table = this.ui.table()
table.head(['Name', 'Email', 'Score'])

// Optionally define column widths
table.columnWidths([15, 30, 10])

// Add new rows
table.row(['Virk', 'virk@adonisjs.com', '67'])
table.row(['Romain', 'romain@adonisjs.com', '82'])
table.row(['Nikk', 'nikk@adonisjs.com', '41'])

// Render the table
table.render()
- You create a new table instance using the
this.ui.table()method. - Create the table head using the
.head()method and pass an array of columns to create. - Add new rows using the
.row()method. - And finally, render the table using the
.render()method.
Display instructions
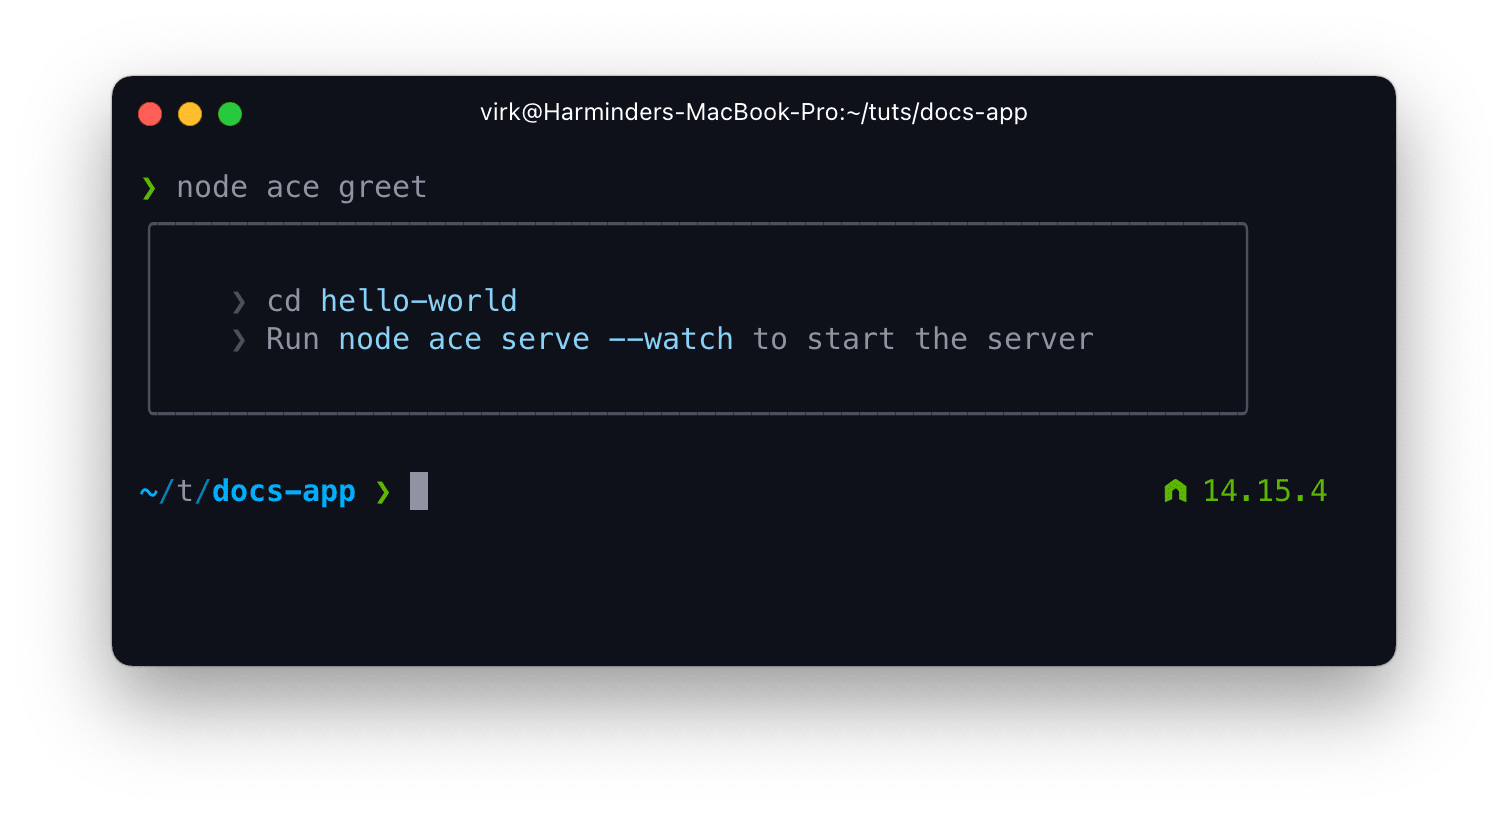
You can display instructions for a given action by drawing them inside a bounded box. For example:
this.ui
  .instructions()
  .add(`cd ${this.colors.cyan('hello-world')}`)
  .add(`Run ${this.colors.cyan('node ace serve --watch')} to start the server`)
  .render()
- Calling the
this.ui.instructions()method begins a new instructions block. - Next, you can add new lines by using the
.add()method. - Finally, call the
.render()method to render it on the console.
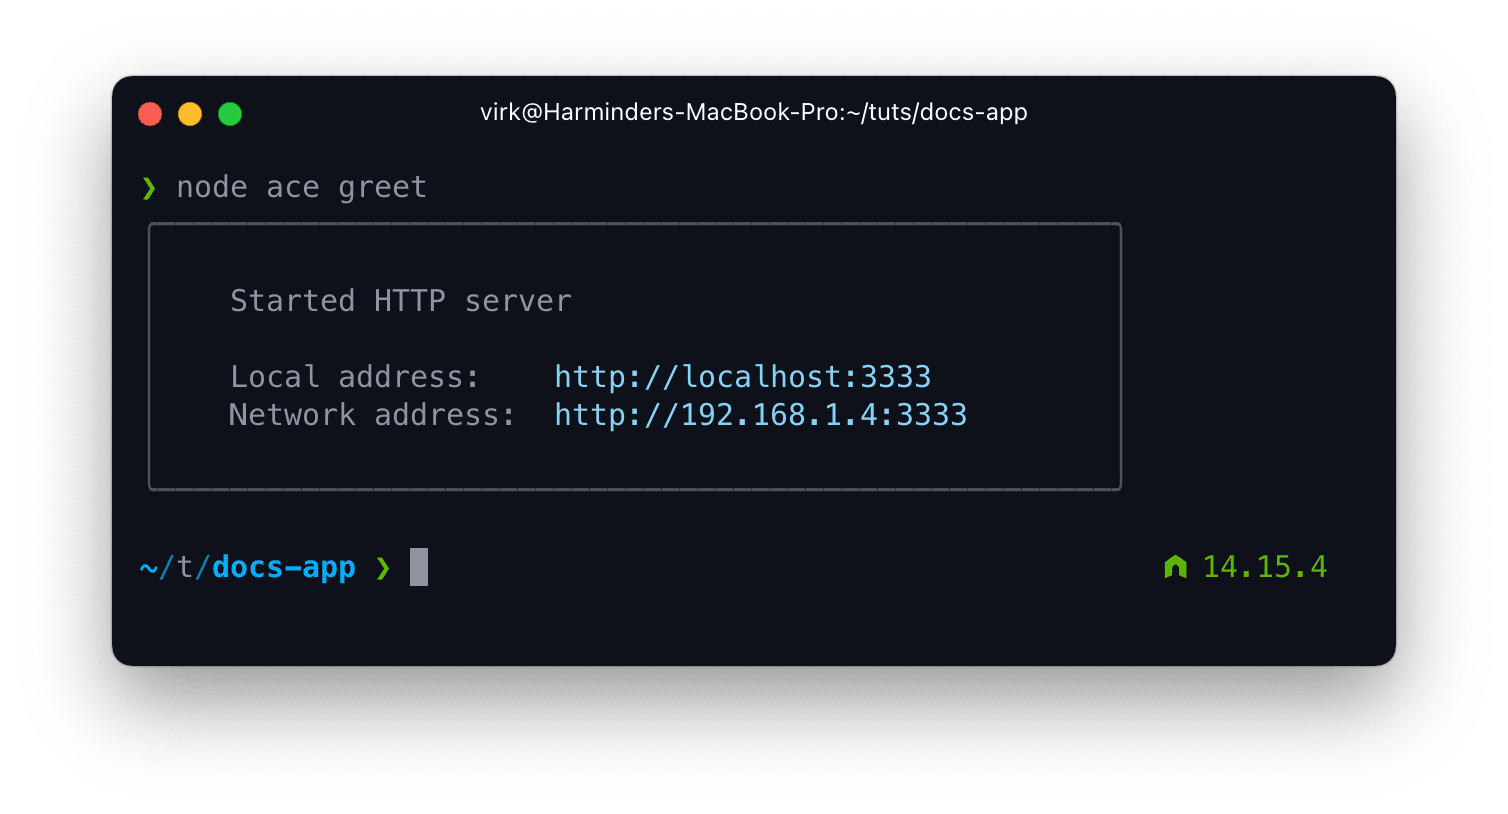
Sticker
A sticker is similar to the instructions block. However, it does not prefix the lines with a pointer >. Rest is all the same.
this.ui
  .sticker()
  .add('Started HTTP server')
  .add('')
  .add(`Local address:    ${this.colors.cyan('http://localhost:3333')}`)
  .add(`Network address:  ${this.colors.cyan('http://192.168.1.4:3333')}`)
  .render()
Tasks renderer
You can make use of the task renderer to display the output of multiple actions. AdonisJS itself uses it to show the UI when scaffolding a new app.
The task renderer has two output modes, i.e., minimal and verbose. We automatically switch to verbose mode when the shell is not interactive
.
const tasksManager = this.ui.tasks()

// Manually switch to verbose renderer
const tasksManager = this.ui.tasks.verbose()
After creating the task renderer, you add a new task by calling the .add method and perform the actual task work inside it. Once done performing the task, you must call task.complete or task.fail to move to the next task in the queue.
tasksManager
  .add('clone repo', async (logger, task) => {
    // use the logger to log about the progress
    await task.complete()
  })
  .add('install package', async (logger, task) => {
    await task.fail(new Error('Cannot install packages'))
  })
Call the run method after defining all the tasks.
await tasksManager.run()
Templates generator
Ace has an inbuilt lightweight template generator. You can use it to generate files from pre-existing stubs. For example:
import { join } from 'path'
import { BaseCommand } from '@adonisjs/core/build/standalone'

export default class Greet extends BaseCommand {
  public static commandName = 'greet'

  public async run() {
    const name = 'UsersController'

    this.generator
      .addFile(name)
      .appRoot(this.application.appRoot)
      .destinationDir('app/Controllers/Http')
      .useMustache()
      .stub(join(__dirname, './templates/controller.txt'))
      .apply({ name })

    await this.generator.run()
  }
}
- The
generator.addFilemethod initiates the process to create a new file. - Using its fluent API, you can define the file destination, its stub, and data to pass to the stub
- Finally execute the
this.generator.runto create all the files added using.addFilemethod.
addFile
The method creates a new instance of the GeneratorFile class. It accepts two arguments; first, the file name (with or without the extension), and second is an object of options.
this.generator.addFile(
  'UserController',
  {
    // force filename to be plural
    form: 'plural',

    // define ".ts" extension when not already defined
    extname: '.ts',

    // re-format the name to "camelCase"
    pattern: 'camelcase',

    // add "Controller" suffix, when not already defined
    suffix: 'Controller',

    // Do not pluralize when controller name matches one of the following
    formIgnoreList: ['Home', 'Auth', 'Login']
  }
)
destinationDir
Define the destination directory in which you want to create the file. You can also pull the directory name from the .adonisrc.json file as follows:
// Get path to the config directory
file.destinationDir(
  this.application.directoriesMap.get('config')!
)

// Get path to the controllers namespace
file.destinationDir(
  this.application.resolveNamespaceDirectory('httpControllers')!
)
appRoot
Define the root of the application. This is prefixed to the destinationDir to create an absolute path.
file.appRoot(this.application.appRoot)
stub
Define an absolute path to the stub template. You can write templates using ES6 template literals or use mustache
by first calling the useMustache method.
file
  .useMustache() // use mustache as the template engine
  .stub(join(__dirname, 'templates/controller.txt'))
apply
Share data with the mustache template. The current filename (after applying all the transformations) is shared with the template as the filename property.
file.apply({
  resourceful: true
})
run
The generator.run method begins creating the files defined using the .addFile method. The generator skips the file if the destination path already exists.
await this.generator.run()
Lifecycle hooks
Commands can define the following lifecycle hooks.
The prepare method is executed before running the run method.
And the completed method is executed after the run method.
export default class Greet extends BaseCommand {
  public async prepare() {
    console.log('before run')
  }

  public async run() {
    console.log('run')
  }

  public async completed() {
    console.log('after run')
  }
}
You can access the error using the this.error property inside the completed method in case of errors.
Executing commands programmatically
Executing other commands in the same process is not a good practice. Commands are NOT meant to be consumed by the different parts of the code as they export a user interface and not a coding interface. For example:
- You find the status of a command from the process exit code and NOT some return value.
- Commands dump their state to the terminal directly and don't store it inside some property to be accessed programmatically.
With all this said, there are a couple of ways to execute commands programmatically.
Execute command as a child process
The recommended approach is to execute the command in a separate child process. You can make use of the Node.js child_process module or use the execa
npm module.
import execa from 'execa'
import { BaseCommand } from '@adonisjs/core/build/standalone'

export default class Greet extends BaseCommand {
  public static commandName = 'greet'

  public async run() {
    const { exitCode } = await execa.node('ace', ['make:controller', 'User'], {
      stdio: 'inherit',
    })
  }
}
Execute command within the same process
Another option is to make use of the Ace kernel to execute the command within the same process. In the following example, there is no way to know the exit code for the command.
import { BaseCommand } from '@adonisjs/core/build/standalone'

export default class Greet extends BaseCommand {
  public static commandName = 'greet'

  public async run() {
    await this.kernel.exec('make:controller', ['User'])
  }
}
Generating the Ace manifest file
Ace manifest is a JSON index of all the registered commands. It allows Ace to look up the command, the argument/flags it accepts without loading all the command files.
Generating an index is essential for performance. Otherwise, importing all the commands, compiling them using the in-memory TypeScript compiler will take a lot of time, even to print the help screen.
AdonisJS automatically updates the ace-manifest.json file during the following events.
- Every time you install and configure a package using the
node ace configurecommand. - When the file watcher runs, and you change a command file stored inside the
commandsdirectory.
These two events alone cover the majority of use cases. However, you can also manually update the manifest file by running the following command.
node ace generate:manifest