Relationships
The Lucid data models have out of box support for working with relationships. You have to define the relationships on your models, and Lucid will do all the heavy lifting of constructing the underlying SQL queries.
HasOne
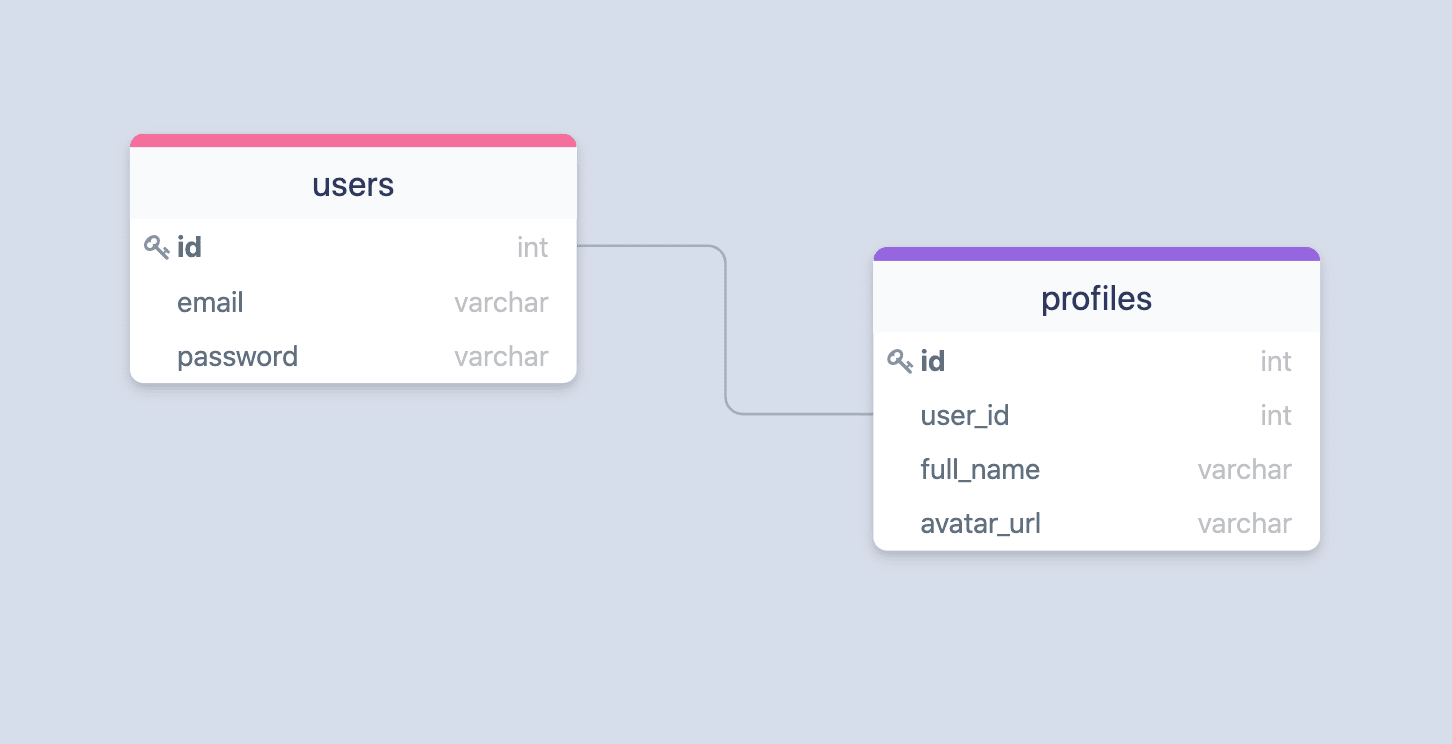
HasOne creates a one-to-one relationship between two models. For example, A user has a profile. The has one relationship needs a foreign key in the related table.
Following is an example table structure for the has one relationship. The profiles.user_id is the foreign key and forms the relationship with the users.id column.
Following are the example migrations for the users and the profiles tables.
import BaseSchema from '@ioc:Adonis/Lucid/Schema'

export default class Users extends BaseSchema {
  protected tableName = 'users'

  public async up () {
    this.schema.createTable(this.tableName, (table) => {
      table.increments('id').primary()
      table.timestamp('created_at', { useTz: true })
      table.timestamp('updated_at', { useTz: true })
    })
  }
}
import BaseSchema from '@ioc:Adonis/Lucid/Schema'

export default class Profiles extends BaseSchema {
  protected tableName = 'profiles'

  public async up () {
    this.schema.createTable(this.tableName, (table) => {
      table.increments('id')
      table
        .integer('user_id')
        .unsigned()
        .references('users.id')
        .onDelete('CASCADE') // delete profile when user is deleted
      table.timestamp('created_at', { useTz: true })
      table.timestamp('updated_at', { useTz: true })
    })
  }
}
Defining relationship on the model
Once you have created the tables with the required columns, you will also have to define the relationship on the Lucid model.
The has one relationship is defined using the @hasOne decorator on a model property.
import Profile from 'App/Models/Profile'

import {
  column,
  BaseModel,
  hasOne,
  HasOne
} from '@ioc:Adonis/Lucid/Orm'

export default class User extends BaseModel {
  @hasOne(() => Profile)
  public profile: HasOne<typeof Profile>
}
Custom relationship keys
By default, the foreignKey is the camelCase representation of the parent model name and its primary key. However, you can also define a custom foreign key.
@hasOne(() => Profile, {
  foreignKey: 'profileUserId', // defaults to userId
})
public profile: HasOne<typeof Profile>
Remember, if you intend to use camelCase for your foreign key definition, keep in mind that the default naming strategy will automatically convert it to snake_case.
The local key is always the primary key of the parent model but can also be defined explicitly.
@hasOne(() => Profile, {
  localKey: 'uuid', // defaults to id
})
public profile: HasOne<typeof Profile>
HasMany
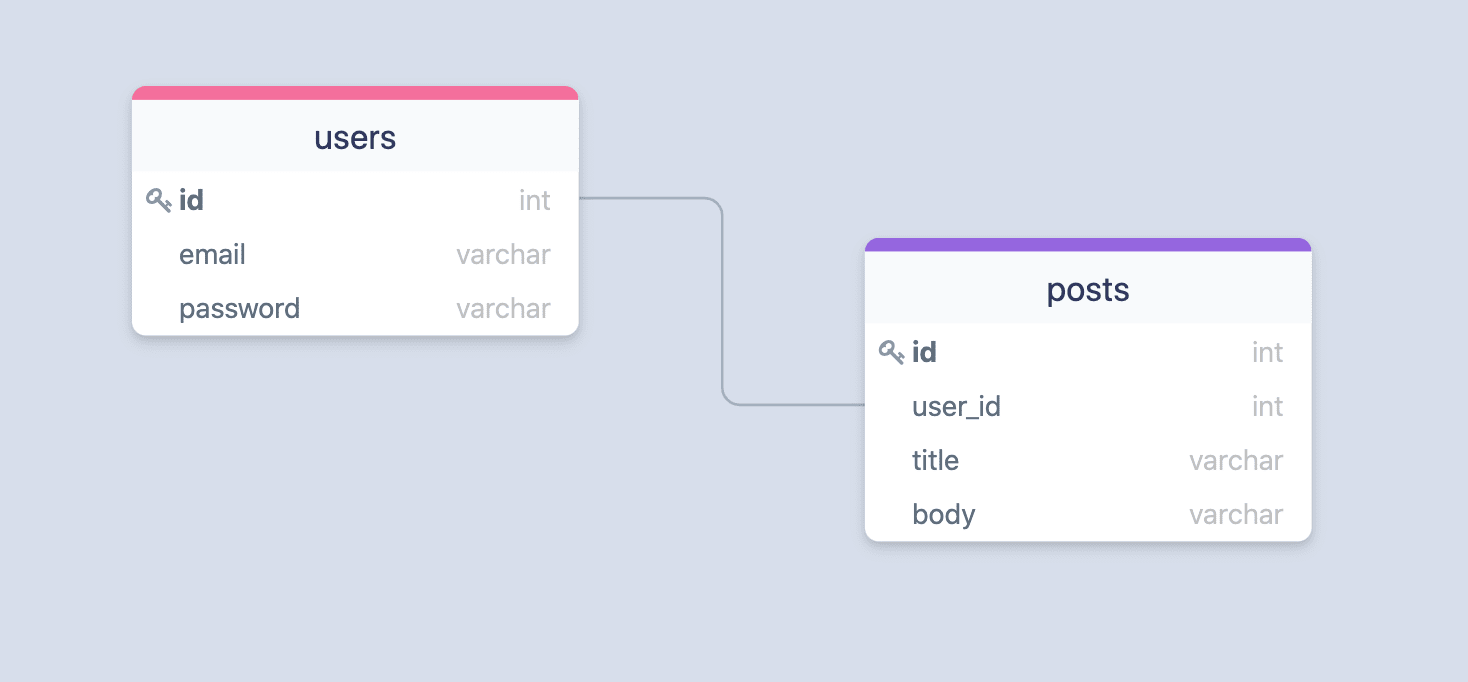
HasMany creates a one-to-many relationship between two models. For example, A user has many posts. The hasMany relationship needs a foreign key in the related table.
Following is an example table structure for the hasMany relationship. The posts.user_id is the foreign key and forms the relationship with the users.id column.
Following are the example migrations for the users and the posts tables.
import BaseSchema from '@ioc:Adonis/Lucid/Schema'

export default class Users extends BaseSchema {
  protected tableName = 'users'

  public async up () {
    this.schema.createTable(this.tableName, (table) => {
      table.increments('id').primary()
      table.timestamp('created_at', { useTz: true })
      table.timestamp('updated_at', { useTz: true })
    })
  }
}
import BaseSchema from '@ioc:Adonis/Lucid/Schema'

export default class Posts extends BaseSchema {
  protected tableName = 'posts'

  public async up () {
    this.schema.createTable(this.tableName, (table) => {
      table.increments('id')
      table
        .integer('user_id')
        .unsigned()
        .references('users.id')
        .onDelete('CASCADE') // delete post when user is deleted
      table.timestamp('created_at', { useTz: true })
      table.timestamp('updated_at', { useTz: true })
    })
  }
}
Defining relationship on the model
Once you have created the tables with the required columns, you will also have to define the relationship on the Lucid model.
The has many relationship is defined using the @hasMany decorator on a model property.
import Post from 'App/Models/Post'

import {
  column,
  BaseModel,
  hasMany,
  HasMany
} from '@ioc:Adonis/Lucid/Orm'

export default class User extends BaseModel {
  @hasMany(() => Post)
  public posts: HasMany<typeof Post>
}
Custom relationship keys
By default, the foreignKey is the camelCase representation of the parent model name and its primary key. However, you can also define a custom foreign key.
@hasMany(() => Post, {
  foreignKey: 'authorId', // defaults to userId
})
public posts: HasMany<typeof Post>
Remember, if you intend to use camelCase for your foreign key definition, keep in mind that the default naming strategy will automatically convert it to snake_case.
The local key is always the primary key of the parent model but can also be defined explicitly.
@hasMany(() => Post, {
  localKey: 'uuid', // defaults to id
})
public posts: HasMany<typeof Post>
BelongsTo
BelongsTo is the inverse of the hasOne and the hasMany relationship. So, for example, profile belongs to a user and a post belongs to a user.
You can leverage the same table structure and the same foreign key conventions to define a belongsTo relationship.
The belongs to relationship is defined using the @belongsTo decorator on a model property.
import User from 'App/Models/User'
import {
  column,
  BaseModel,
  belongsTo,
  BelongsTo
} from '@ioc:Adonis/Lucid/Orm'

export default class Profile extends BaseModel {
  // Foreign key is still on the same model
  @column()
  public userId: number

  @belongsTo(() => User)
  public user: BelongsTo<typeof User>
}
ManyToMany
A many-to-many relationship is slightly complex, as it allows both sides to have more than one relationship with each other. For example: A user can have many skills, and a skill can also belong to many users.
You need a third table (usually known as a pivot table) for this relationship to work. The pivot table holds the foreign keys for both the other tables.
In the following example, the skill_user table has the foreign keys for both the users and the skills table, allowing each user to have many skills and vice versa.

Following are the example migrations for the users, skills, and the skill_user tables.
import BaseSchema from '@ioc:Adonis/Lucid/Schema'

export default class Users extends BaseSchema {
  protected tableName = 'users'

  public async up () {
    this.schema.createTable(this.tableName, (table) => {
      table.increments('id').primary()
      table.timestamp('created_at', { useTz: true })
      table.timestamp('updated_at', { useTz: true })
    })
  }
}
import BaseSchema from '@ioc:Adonis/Lucid/Schema'

export default class Skills extends BaseSchema {
  protected tableName = 'skills'

  public async up () {
    this.schema.createTable(this.tableName, (table) => {
      table.increments('id').primary()
      table.timestamp('created_at', { useTz: true })
      table.timestamp('updated_at', { useTz: true })
    })
  }
}
import BaseSchema from '@ioc:Adonis/Lucid/Schema'

export default class SkillUsers extends BaseSchema {
  protected tableName = 'skill_user'

  public async up () {
    this.schema.createTable(this.tableName, (table) => {
      table.increments('id').primary()
      table.integer('user_id').unsigned().references('users.id')
      table.integer('skill_id').unsigned().references('skills.id')
      table.unique(['user_id', 'skill_id'])
      table.timestamp('created_at', { useTz: true })
      table.timestamp('updated_at', { useTz: true })
    })
  }
}
Defining relationship on the model
Once you have created the tables with the required columns, you will also have to define the relationship on the Lucid model.
The many to many relationship is defined using the @manyToMany decorator on a model property.
There is no need to create a model for the pivot table.
import Skill from 'App/Models/Skill'
import {
  column,
  BaseModel,
  manyToMany,
  ManyToMany,
} from '@ioc:Adonis/Lucid/Orm'

export default class User extends BaseModel {
  @column({ isPrimary: true })
  public id: number

  @manyToMany(() => Skill)
  public skills: ManyToMany<typeof Skill>
}
Custom relationship keys
A manyToMany relation relies on many different keys to properly set up the relationship. All of these keys are computed using standard conventions. However, you are free to override them.
localKeyis the primary key of the parent model (i.e., User)relatedKeyis the primary key of the related model (i.e., Skill)pivotForeignKeyis the foreign key for establishing the relationship with the parent model. The default value is thesnake_caseversion of the parent model name and its primary key.pivotRelatedForeignKeyis the foreign key for establishing the relationship with the related model. The default value is thesnake_caseversion of the related model name and its primary key.
@manyToMany(() => Skill, {
  localKey: 'id',
  pivotForeignKey: 'user_id',
  relatedKey: 'id',
  pivotRelatedForeignKey: 'skill_id',
})
public skills: ManyToMany<typeof Skill>
Remember, if you intend to use camelCase for your foreign key definition, keep in mind that the default naming strategy will automatically convert it to snake_case.
Custom pivot table
The default value for the pivot table name is computed by combining the parent model name and the related model name. However, you can also define a custom pivot table.
@manyToMany(() => Skill, {
  pivotTable: 'user_skills',
})
public skills: ManyToMany<typeof Skill>
Additional pivot columns
At times your pivot table will have additional columns. For example, you are storing the proficiency alongside the user skill.
You will have to inform a manyToMany relationship about this extra column. Otherwise, Lucid will not select it during the fetch queries.
@manyToMany(() => Skill, {
  pivotColumns: ['proficiency'],
})
public skills: ManyToMany<typeof Skill>
Pivot table timestamps
You can enable the support for created at and updated at timestamps for your pivot tables using the pivotTimestamps property.
- Once defined, Lucid will automatically set/update these timestamps on insert and update queries.
- Converts them to an instance of Luxon Datetime class during fetch.
@manyToMany(() => Skill, {
  pivotTimestamps: true
})
public skills: ManyToMany<typeof Skill>
Settings pivotTimestamps = true assumes the column names are defined as created_at and updated_at. However, you can define custom column names as well.
@manyToMany(() => Skill, {
  pivotTimestamps: {
    createdAt: 'creation_date',
    updatedAt: 'updation_date'
  }
})
public skills: ManyToMany<typeof Skill>
To disable a particular timestamp, you can set its value to false.
@manyToMany(() => Skill, {
  pivotTimestamps: {
    createdAt: 'creation_date',
    updatedAt: false // turn off update at timestamp field
  }
})
public skills: ManyToMany<typeof Skill>
HasManyThrough
The HasManyThrough relationship is similar to the HasMany relationship but creates the relationship through an intermediate model. For example, A country has many posts through users.
- This relationship needs the through model (i.e., User) to have a foreign key reference with the current model (i.e., Country).
The related model (i.e., Post) has a foreign key reference with the through model (i.e., User).
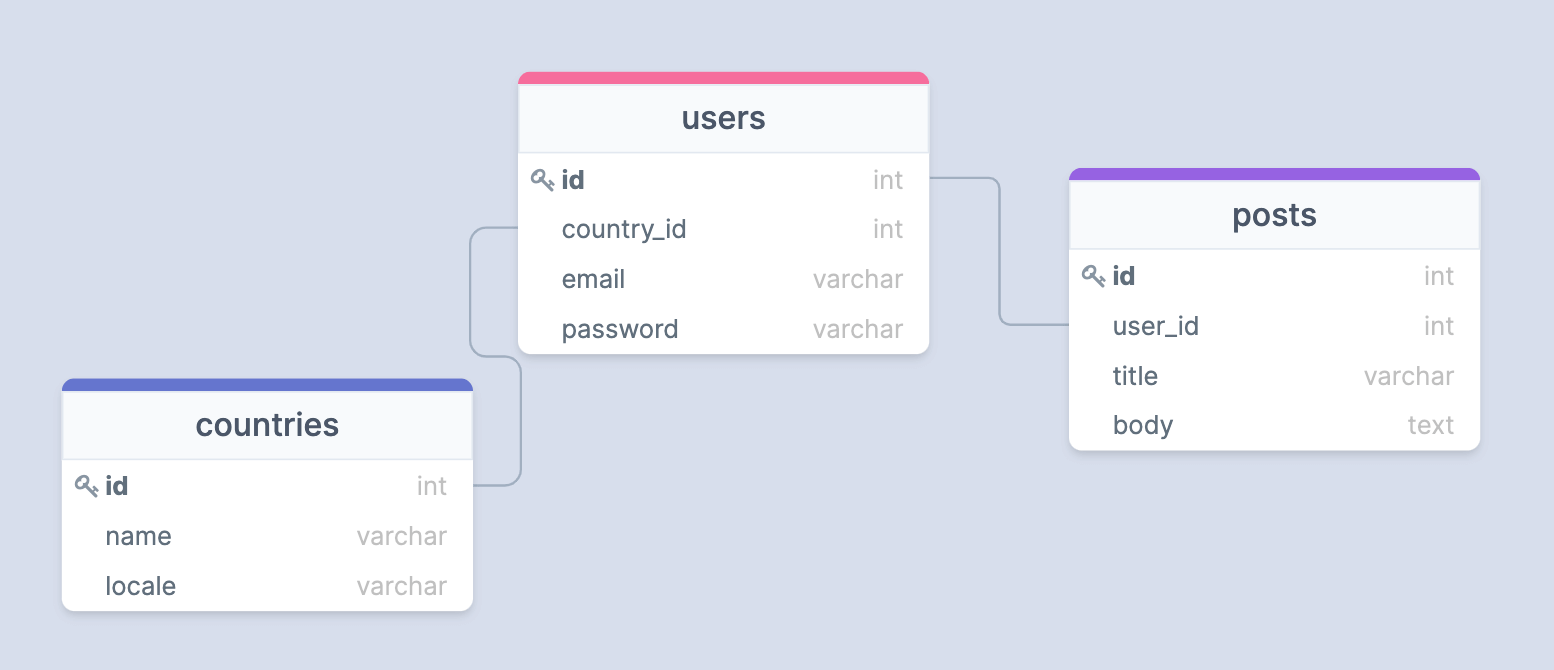
Following are the example migrations for the countries, users, and the posts tables.
import BaseSchema from '@ioc:Adonis/Lucid/Schema'

export default class Countries extends BaseSchema {
  protected tableName = 'countries'

  public async up () {
    this.schema.createTable(this.tableName, (table) => {
      table.increments('id').primary()
      table.timestamp('created_at', { useTz: true })
      table.timestamp('updated_at', { useTz: true })
    })
  }
}
import BaseSchema from '@ioc:Adonis/Lucid/Schema'

export default class Users extends BaseSchema {
  protected tableName = 'users'

  public async up () {
    this.schema.createTable(this.tableName, (table) => {
      table.increments('id').primary()
      table
        .integer('country_id')
        .unsigned()
        .references('countries.id')
      table.timestamp('created_at', { useTz: true })
      table.timestamp('updated_at', { useTz: true })
    })
  }
}
import BaseSchema from '@ioc:Adonis/Lucid/Schema'

export default class Posts extends BaseSchema {
  protected tableName = 'posts'

  public async up () {
    this.schema.createTable(this.tableName, (table) => {
      table.increments('id').primary()
      table
        .integer('user_id')
        .unsigned()
        .references('users.id')
      table.timestamp('created_at', { useTz: true })
      table.timestamp('updated_at', { useTz: true })
    })
  }
}
Defining relationship on the model
Once you have created the tables with the required columns, you will also have to define the relationship on the Lucid model.
The has many through relationship is defined using the @hasManyThrough decorator on a model property.
import Post from 'App/Models/Post'
import User from 'App/Models/User'
import {
  BaseModel,
  column,
  hasManyThrough,
  HasManyThrough
} from '@ioc:Adonis/Lucid/Orm'

export default class Country extends BaseModel {
  @column({ isPrimary: true })
  public id: number

  @hasManyThrough([
    () => Post,
    () => User,
  ])
  public posts: HasManyThrough<typeof Post>
}
Preload relationship
Preloading allows you to fetch the relationship data alongside the main query. For example: Select all the users and preload their profiles at the same time.
- The
preloadmethod accepts the name of the relationship defined on the model. - The relationship property value for the
hasOneand thebelongsTorelationship is either set to the related model instance ornullwhen no records are found.
The relationship property value is an array of the related model instance for all other relationship types.
const users = await User
  .query()
  .preload('profile')

users.forEach((user) => {
  console.log(user.profile)
})
You can modify the relationship query by passing an optional callback to the preload method.
const users = await User
  .query()
  .preload('profile', (profileQuery) => {
    profileQuery.where('isActive', true)
  })
Preload multiple relationships
You can preload multiple relationships together by calling the preload method for multiple times. For example:
const users = await User
  .query()
  .preload('profile')
  .preload('posts')
Preload nested relationships
You can preload nested relationships using the relationship query builder accessible via the optional callback.
In the following example, we fetch all the users, preload their posts, and then fetch all the comments for each post, along with the comment user.
const users = await User
  .query()
  .preload('posts', (postsQuery) => {
    postsQuery.preload('comments', (commentsQuery) => {
      commentsQuery.preload('user')
    })
  })
Many to many pivot columns
When preloading a manyToMany relationship, the pivot table columns are moved to the $extras object on the relationship instance.
By default, we only select the foreign keys from the pivot table. However, you can define additional pivot columns to select at defining the relationship or runtime.
const users = await User
  .query()
  .preload('skills', (query) => {
    query.pivotColumns(['proficiency'])
  })

users.forEach((user) => {
  user.skills.forEach((skill) => {
    console.log(skill.$extras.pivot_proficiency)
    console.log(skill.$extras.pivot_user_id)
    console.log(skill.$extras.pivot_skill_id)
    console.log(skill.$extras.pivot_created_at)
  })
})
Lazy load relationships
Along with preloading, you can also load relationships directly from a model instance.
const user = await User.find(1)

// Lazy load the profile
await user.load('profile')
console.log(user.profile) // Profile | null

// Lazy load the posts
await user.load('posts')
console.log(user.posts) // Post[]
Like the preload method, the load method also accepts an optional callback to modify the relationship query.
await user.load('profile', (profileQuery) => {
  profileQuery.where('isActive', true)
})
You can load multiple relationships by calling the load method multiple times or grabbing an instance of the underlying relationship loader.
// Calling "load" method multiple times
await user.load('profile')
await user.load('posts')
// Using the relationships loader
await user.load((loader) => {
  loader.load('profile').load('posts')
})
Limit preloaded relationships
Let's say you want to load all the posts and fetch the recent three comments for each post.
Using the query builder limit method will not give you the desired output since the limit is applied to the entire data set and not on the comments of an individual post.
Therefore, you must use the groupLimit method that uses SQL window functions
to apply a limit on each parent record separately.
const posts = await Post
  .query()
  .preload('comments', (query) => {
    query.groupLimit(3)
  })
Relationship query builder
Make sure to read the relationship API docs to view all the available methods/properties available on the query builder.
You can also access the query builder for a relationship using the related method. The relationship queries are always scoped to a given parent model instance.
Lucid will automatically add the where clause for limiting the posts to the given user in the following example.
const user = await User.find(1)
const posts = await user.related('posts').query()
The query method returns a standard query builder instance, and you can chain any methods to it to add additional constraints.
const posts = await user
  .related('posts')
  .query()
  .where('isPublished', true)
  .paginate(1)
You can also use the relationship query builder to update and delete related rows. However, doing so will not execute
any of the model hooks.
Filter by relationships
You can also filter the records of the main query by checking for the existence or absence of a relationship. For example, select all posts that have received one or more comments.
You can filter by relationship using the has or the whereHas methods. They accept the relationship name as the first argument. Optionally you can also pass an operator and number of expected rows.
// Get posts with one or more comments
const posts = await Post
  .query()
  .has('comments')

// Get posts with more than 2 comments
const posts = await Post
  .query()
  .has('comments', '>', 2)
You can make use of the whereHas method to add additional constraints for the relationship query. In the following example, we only fetch posts that have one or more approved comments.
const posts = await Post
  .query()
  .whereHas('comments', (query) => {
    query.where('isApproved', true)
  })
Similar to the has method, the whereHas also accepts an optional operator and the count of expected rows.
const posts = await Post
  .query()
  .whereHas('comments', (query) => {
    query.where('isApproved', true)
  }, '>', 2)
Following is the list of has and whereHas variations.
orHas | orWhereHasadds an OR clause for the relationship existence.doesntHave | whereDoesntHavechecks for the absence of the relationship.orDoesntHave | orWhereDoesntHaveadds an OR clause for the relationship absence.
Relationship aggregates
The relationships API of Lucid also allows you to load the aggregates for relationships. For example, You can fetch a list of posts with a count of comments for each post.
withAggregate
The withAggregate method accepts the relationship as the first argument and a mandatory callback to define the value's aggregate function and property name.
In the following example, the comments_count property is moved to the $extras object because it is not defined as a property on the model.
const posts = await Post
  .query()
  .withAggregate('comments', (query) => {
    query.count('*').as('comments_count')
  })

posts.forEach((post) => {
  console.log(post.$extras.comments_count)
})
withCount
Since counting relationship rows is a very common requirement, you can instead use the withCount method.
const posts = await Post.query().withCount('comments')

posts.forEach((post) => {
  console.log(post.$extras.comments_count)
})
You can also provide a custom name for the count property using the as method.
const posts = await Post
  .query()
  .withCount('comments', (query) => {
    query.as('commentsCount')
  })

posts.forEach((post) => {
  console.log(post.$extras.commentsCount)
})
You can define constraints to the count query by passing an optional callback to the withCount method.
const posts = await Post
  .query()
  .withCount('comments', (query) => {
    query.where('isApproved', true)
  })
Lazy load relationship aggregates
Similar to the withCount and the withAggregate methods, you can also lazy load the aggregates from a model instance using loadCount and the loadAggregate methods.
const post = await Post.findOrFail()
await post.loadCount('comments')

console.log(post.$extras.comments_count)
const post = await Post.findOrFail()
await post.loadAggregate('comments', (query) => {
  query.count('*').as('commentsCount')
})

console.log(post.$extras.commentsCount)
Make sure you are using the loadCount method only when working with a single model instance. If there are multiple model instances, it is better to use the query builder withCount method.
Relationship query hook
You can define an onQuery relationship hook at the time of defining a relationship. Then, the query hooks get executed for all the select, update, and delete queries executed by the relationship query builder.
The onQuery method is usually helpful when you always apply certain constraints to the relationship query.
import UserEmail from 'App/Models/UserEmail'
import {
  column,
  BaseModel,
  hasMany,
  HasMany
} from '@ioc:Adonis/Lucid/Orm'

export default class User extends BaseModel {
  @hasMany(() => UserEmail)
  public emails: HasMany<typeof UserEmail>

  @hasMany(() => UserEmail, {
    onQuery: (query) => {
      query.where('isActive', true)
    }
  })
  public activeEmails: HasMany<typeof UserEmail>
}
Create relationships
You can create relationships between two models using the relationships persistence API. Make sure to also check out the API docs to view all the available methods.
create
In the following example, we create a new comment and link it to the post at the same time. The create method accepts a plain JavaScript object to persist. The foreign key value is defined automatically.
const post = await Post.findOrFail(1)
const comment = await post.related('comments').create({
  body: 'This is a great post'
})

console.log(comment.postId === post.id) // true
save
Following is an example using the save method. The save method needs an instance of the related model. The foreign key value is defined automatically.
const post = await Post.findOrFail(1)

const comment = new Comment()
comment.body = 'This is a great post'

await post.related('comments').save(comment)

console.log(comment.postId === post.id) // true
createMany
You can also create multiple relationships using the createMany method. The method is only available for hasMany and manyToMany relationships.
The createMany method returns an array of persisted model instances.
const comments = await Post
  .related('comments')
  .createMany([
    {
      body: 'This is a great post.'
    },
    {
      body: 'Well written.'
    }
  ])
saveMany
Similar to the save method. The saveMany method allows persisting multiple relationships together.
const comment1 = new Comment()
comment1.body = 'This is a great post'

const comment2 = new Comment()
comment2.body = 'Well written'

await Post
  .related('comments')
  .saveMany([comment1, comment2])
associate
The associate method is exclusive to the belongsTo relationship. It let you associate two models with each other.
const user = await User.findOrFail(1)

const profile = new Profile()
profile.avatarUrl = 'foo.jpg'
await profile.related('user').associate(user)
dissociate
The dissociate removes the relationship by setting the foreign key to null. Thus, the method is exclusive to the belongsTo relationship.
await profile = await Profile.findOrFail(1)
await profile.related('user').dissociate()
attach
The attach method is exclusive to a manyToMany relationship. It allows you to create a relationship between two persisted models inside the pivot table.
The attach method just needs the id of the related model to form the relationship inside the pivot table.
const user = await User.find(1)
const skill = await Skill.find(1)

// Performs insert query inside the pivot table
await user.related('skills').attach([skill.id])
You can define additional pivot columns by passing an object of key-value pair. The key is the related model id, and the value is an object of additional columns.
await user.related('skills').attach({
  [skill.id]: {
    proficiency: 'Beginner'
  }
})
detach
The detach method is the opposite of the attach method and allows you to remove the relationship from the pivot table.
It optionally accepts an array of ids to remove. Calling the method without any arguments will remove all the relationships from the pivot table.
const user = await User.find(1)
const skill = await Skill.find(1)

await user.related('skills').detach([skill.id])

// Remove all skills for the user
await user.related('skills').detach()
sync
The sync method allows you to sync the pivot rows. The payload provided to the sync method is considered the source of truth, and we compute a diff internally to execute the following SQL queries.
- Insert the rows missing in the pivot table but present in the sync payload.
- Update the rows present in the pivot table and the sync payload but has one or more changed arguments.
- Remove the rows present in the pivot table but missing in the sync payload.
- Ignore rows present in both the pivot table and the sync payload.
const user = await User.find(1)

// Only skills with id 1, 2, 3 will stay in the pivot table
await user.related('skills').sync([1, 2, 3])
You can also define additional pivot columns as an object of key-value pair.
const user = await User.find(1)

await user.related('skills').sync({
  [1]: {
    proficiency: 'Beginner',
  },
  [2]: {
    proficiency: 'Master'
  },
  [3]: {
    proficiency: 'Master'
  }
})
You can disable the detach option to sync rows without removing any rows from the pivot table.
await user
  .related('skills')
  // Add skills with id 1,2,3, but do not remove any
  // rows from the pivot table
  .sync([1, 2, 3], false)
Delete relationship
For the most part, you can delete related rows directly from its model. For example: You can delete a comment by its id, directly using the Comment model, there is no need to trigger the comment deletion via post.
- For a
manyToManyrelationship, you can use thedetachmethod to remove the row from the pivot table. - Use the
dissociatemethod to remove a belongsTo relationship without deleting the row from the database table.
Using the onDelete action
You can also use the database onDelete action to remove the related data from the database. For example: Delete the posts of a user when the user itself is deleted.
Following is an example migration for setting the onDelete action.
this.schema.createTable(this.tableName, (table) => {
  table.increments('id')
  table
    .integer('user_id')
    .unsigned()
    .references('users.id')
    .onDelete('CASCADE')
})